Back to posts

AWS Journey: Improving Security with SSM and Secrets Manager

Feb 19, 202510 min read

After setting up our CI/CD pipeline, let's enhance our security by:

  1. Replacing SSH with AWS Systems Manager
  2. Moving from .env files to AWS Secrets Manager
  3. Using AWS Parameter Store for configuration

🎯 Prerequisites

  • Existing CI/CD pipeline from previous setup
  • AWS Account with EC2 instance
  • Access to AWS Console
  • Docker and GitLab Runner configured

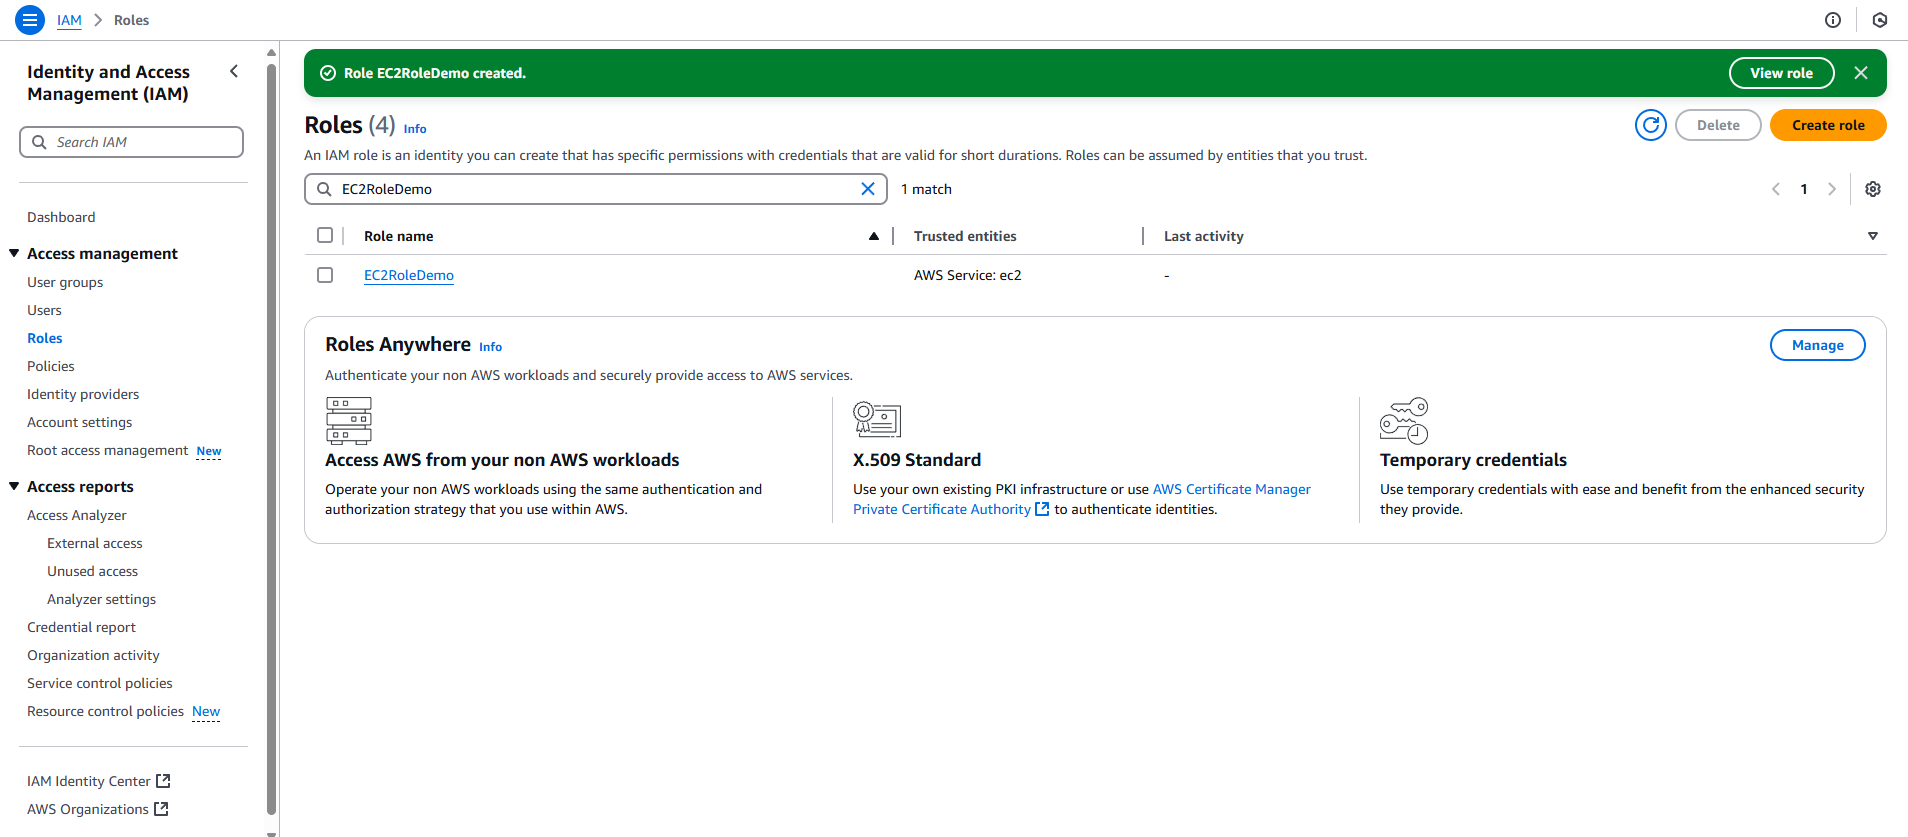
🔑 IAM Role Configuration

Before implementing SSM and Secrets Manager, let's discuss our IAM role strategy.

Role Naming Best Practice

In our previous post, we created a role named "EC2ECRAccess". However, as we're adding more AWS services, it's better to use a generic name that reflects its broader purpose:

💡 Why Generic Role Names?

  • Roles often evolve to include multiple services
  • Avoids confusion and frequent renaming
  • Better represents the role's actual scope
  • Easier to maintain and document

You can either:

  1. Rename existing role to "EC2RoleDemo" or anything else
  2. Or keep current name but note that it will handle:
    • EC2 for instance management
    • ECR for container registry
    • SSM for systems management
    • Secrets Manager for configurations
    • More services as we explore AWS

Adding Required Permissions (If you don't want to rename the role)

Let's add SSM and Secrets Manager permissions to our existing role:

  1. Go to IAM Console > Roles
  2. Find your EC2 role
  3. Click "Attach policies"
  4. Add these managed policies:
    • AmazonEC2ReadOnlyAccess for Get AWS Region
    • AmazonSSMFullAccess for SSM
    • SecretsManagerReadWrite for Secrets Manager

IAM Role for Multiple Services (If you want to create a new role)

  1. Go to IAM Console > Roles
  2. Click "Create role"
  3. Select "EC2" as trusted entity
  4. Select "EC2" as use case
  5. Add these managed policies:
    • AmazonEC2ReadOnlyAccess for Get AWS Region
    • AmazonSSMFullAccess for SSM
    • SecretsManagerReadWrite for Secrets Manager
    • AmazonEC2ContainerRegistryFullAccess for ECR
  6. Name the role as "EC2RoleDemo" or anything else
  7. Review and create Successfully created IAM role Successfully created IAM role

🔒 Security Improvements

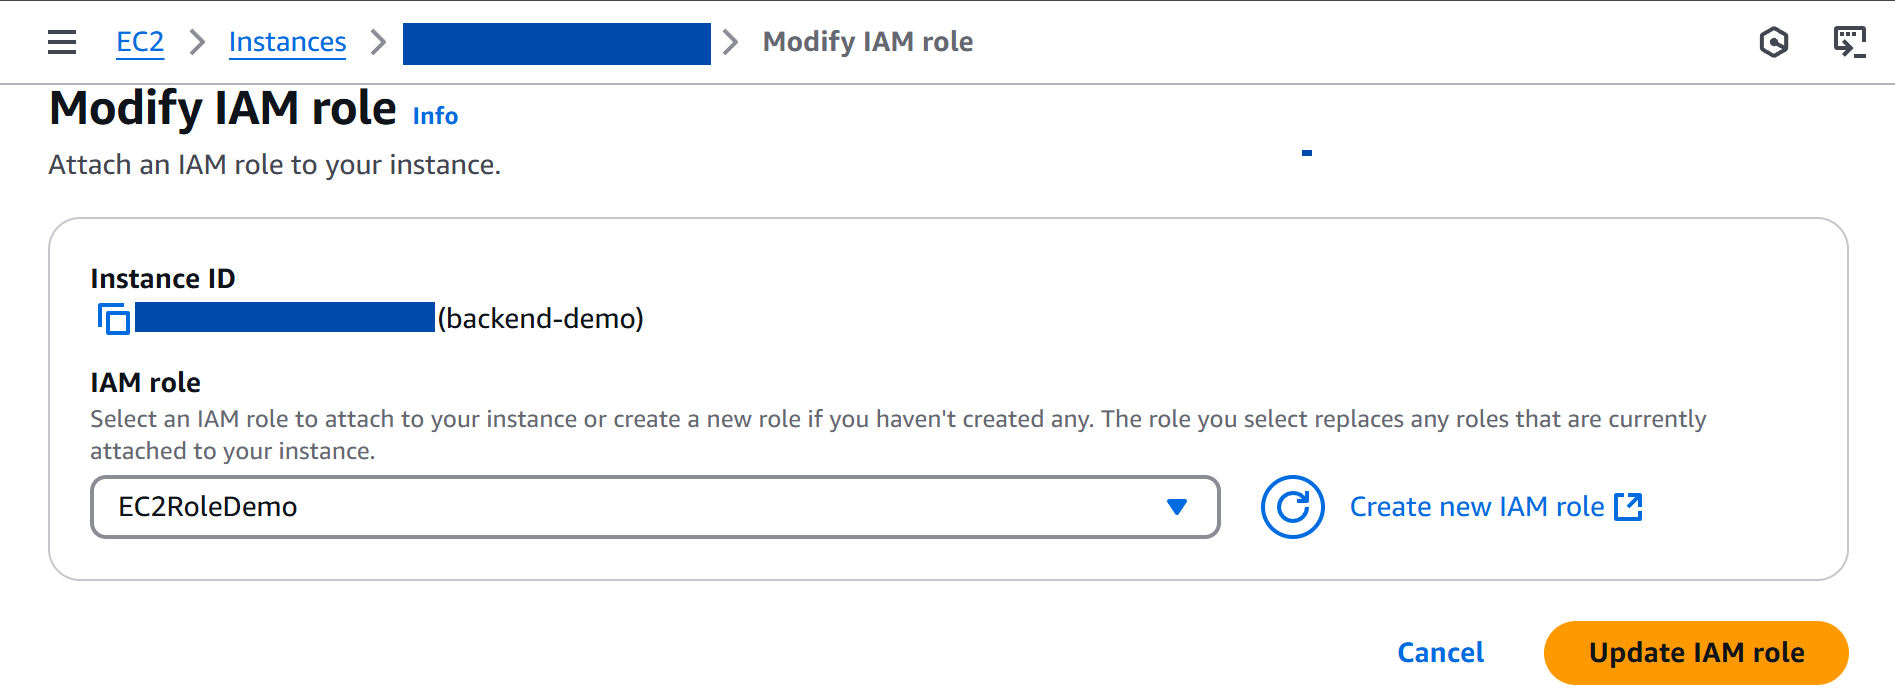
1. AWS Systems Manager Setup

Why Replace SSH?

  • More secure access management
  • No need to manage SSH keys
  • Integration with IAM permissions

Implementation Steps:

  1. Attach Role to EC2: (you can skip this step if you don't want to create a new role, it will use the existing role and update the role's policy automatically)

    • Go to EC2 Console
    • Select your instance
    • Actions > Security > Modify IAM Role
    • Select the created role
    Attaching IAM Role to EC2 Attaching IAM role to EC2 instance
  2. Check SSM Agent Status:

    • Connect to your instance
    • Check if the SSM agent is running
    systemctl status amazon-ssm-agent
    
    • If it's not running, restart it:
    sudo systemctl restart amazon-ssm-agent
    
    • Check again if the SSM agent is already running
    systemctl status amazon-ssm-agent
    
    SSM agent status SSM agent status

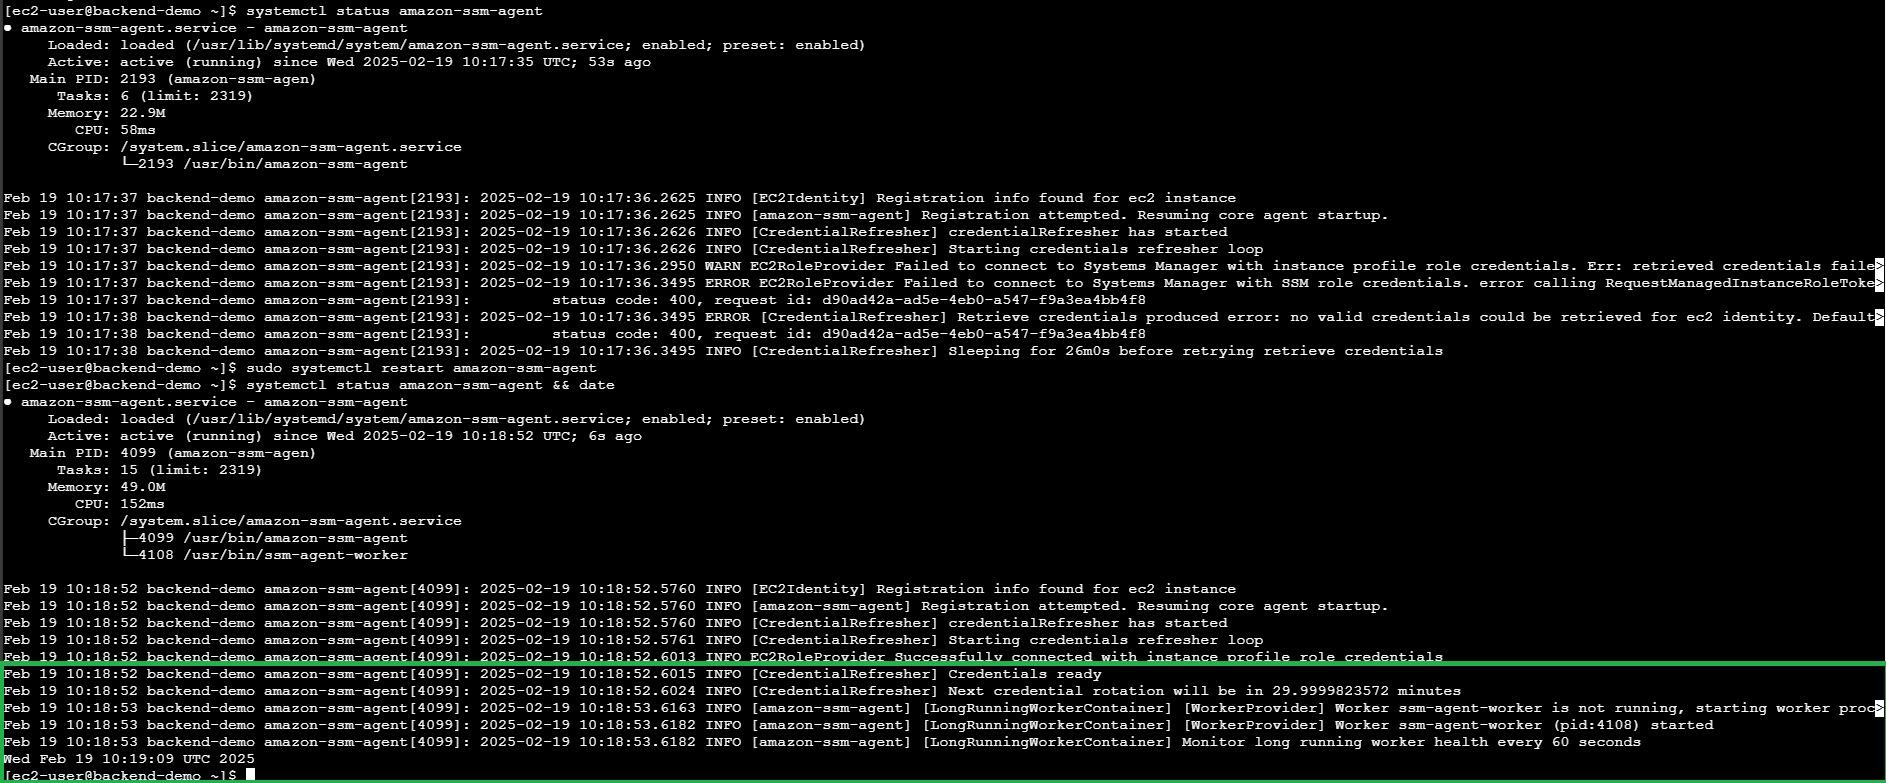
2. AWS Secrets Manager Setup

Why Use Secrets Manager?

  • Centralized secrets management (no more scattered .env files)
  • Fine-grained access control through IAM policies

Implementation Steps:

  1. Create Secrets:

    • Access AWS Console > Secrets Manager
    • Click "Store a new secret"
    • Choose "Other type of secrets"
    • Choose "Plaintext" for better structure and grouping
    • Add your variables:
    {
      "database": {
        "DB_HOST": "mysql",
        "DB_USER": "root",
        "DB_PORT": "3306",
        "DB_PASSWORD": "your_secure_password",
        "DB_ROOT_PASSWORD": "your_secure_root_password",
        "DB_NAME": "your_db_name"
      },
      "aws": {
        "ECR_REPOSITORY_URL": "your_ecr_repository_url",
        "AWS_REGION": "your_aws_region",
        "IMAGE_TAG": "latest"
      },
      "app": {
        "PORT": "8080",
        "GIN_MODE": "release"
      }
    }
    
    • Click "Next"
    • Set secret name as mysecretdemo or anything else
    • Description is optional, we can leave it blank
    • Tag is optional, we can leave it blank
    • Resource permissions is optional, we can leave it blank
    • Replicate secret is optional, we can leave it blank
    • Click "Next"
    • Automatic rotation is not needed for now, we can turn it off
    • Rotation function is not needed for now, we can skip it
    • Click "Next"
    • Click "Store"
    Creating a new secret Creating a new secret
  2. Remove .env file from the directory

  • This is because we will use AWS Secrets Manager to store our secrets
  • Connect to your instance and remove the .env file

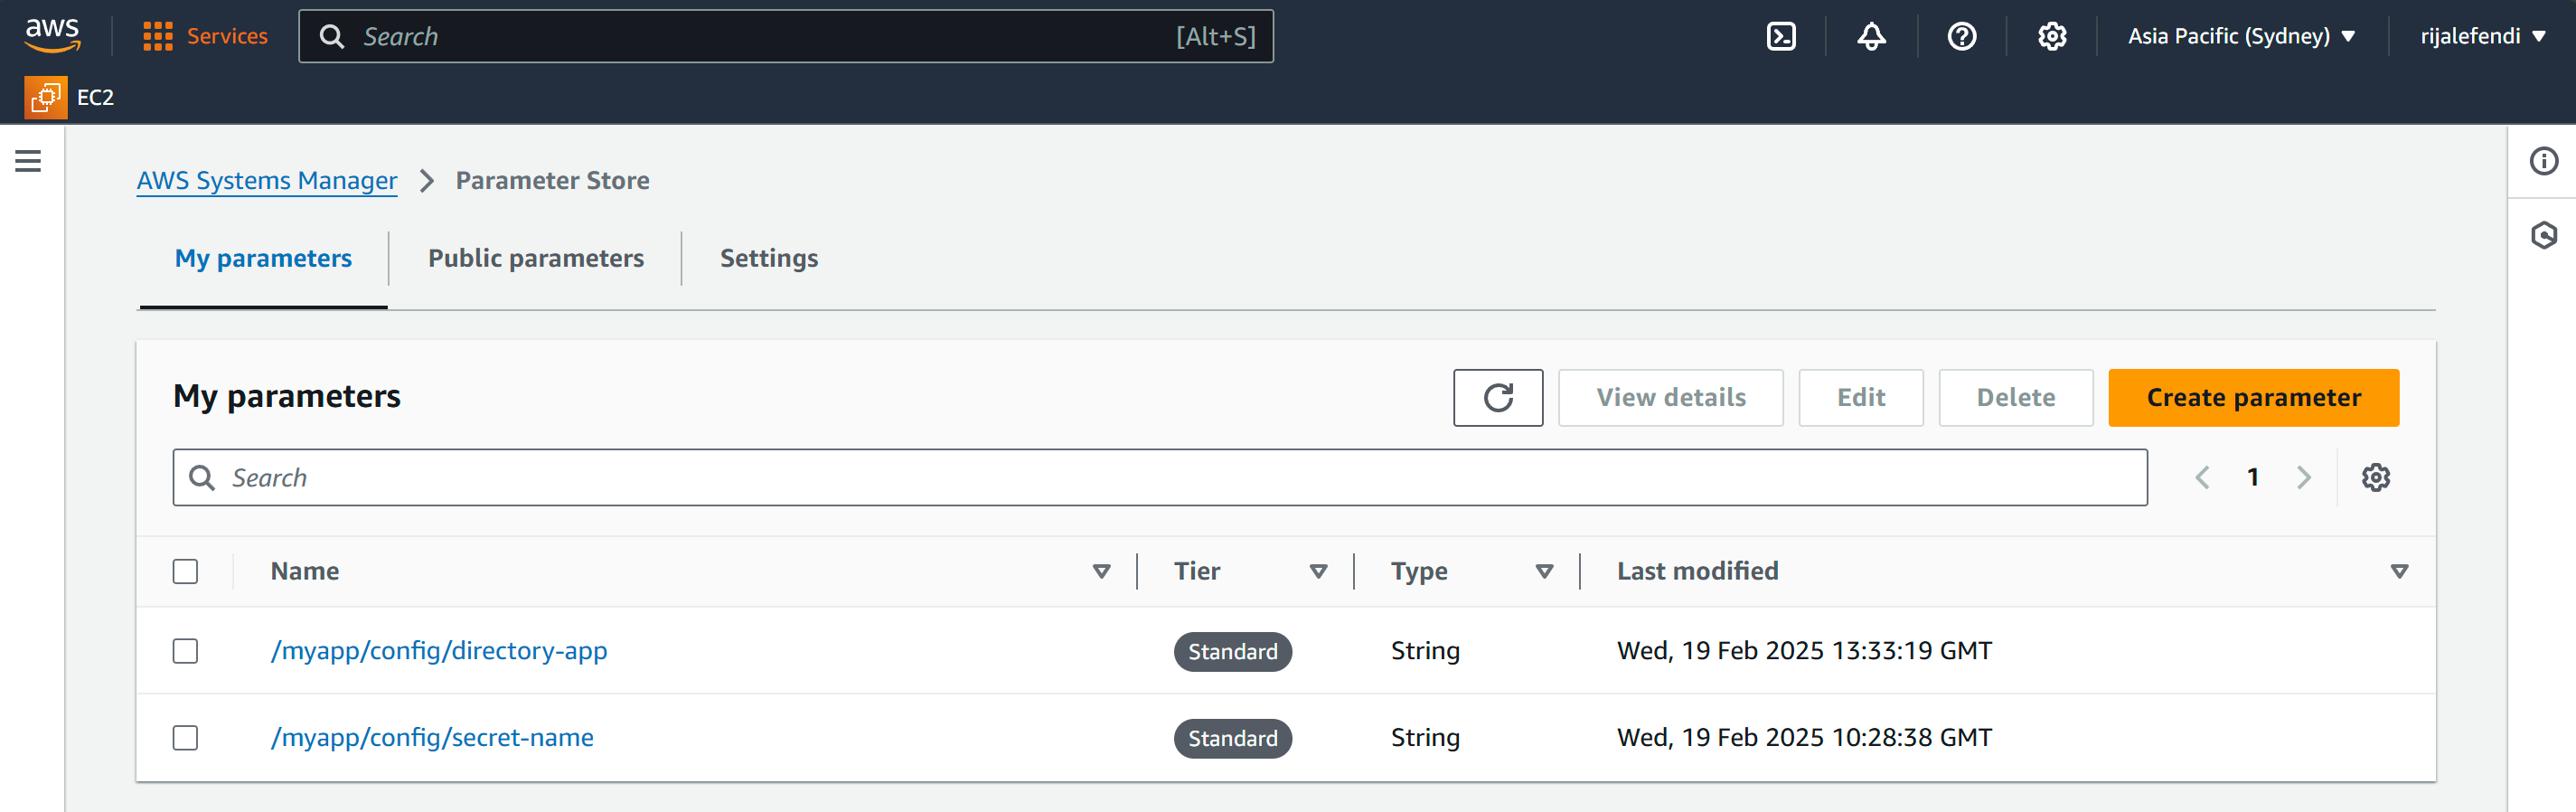
3. AWS Parameter Store Setup
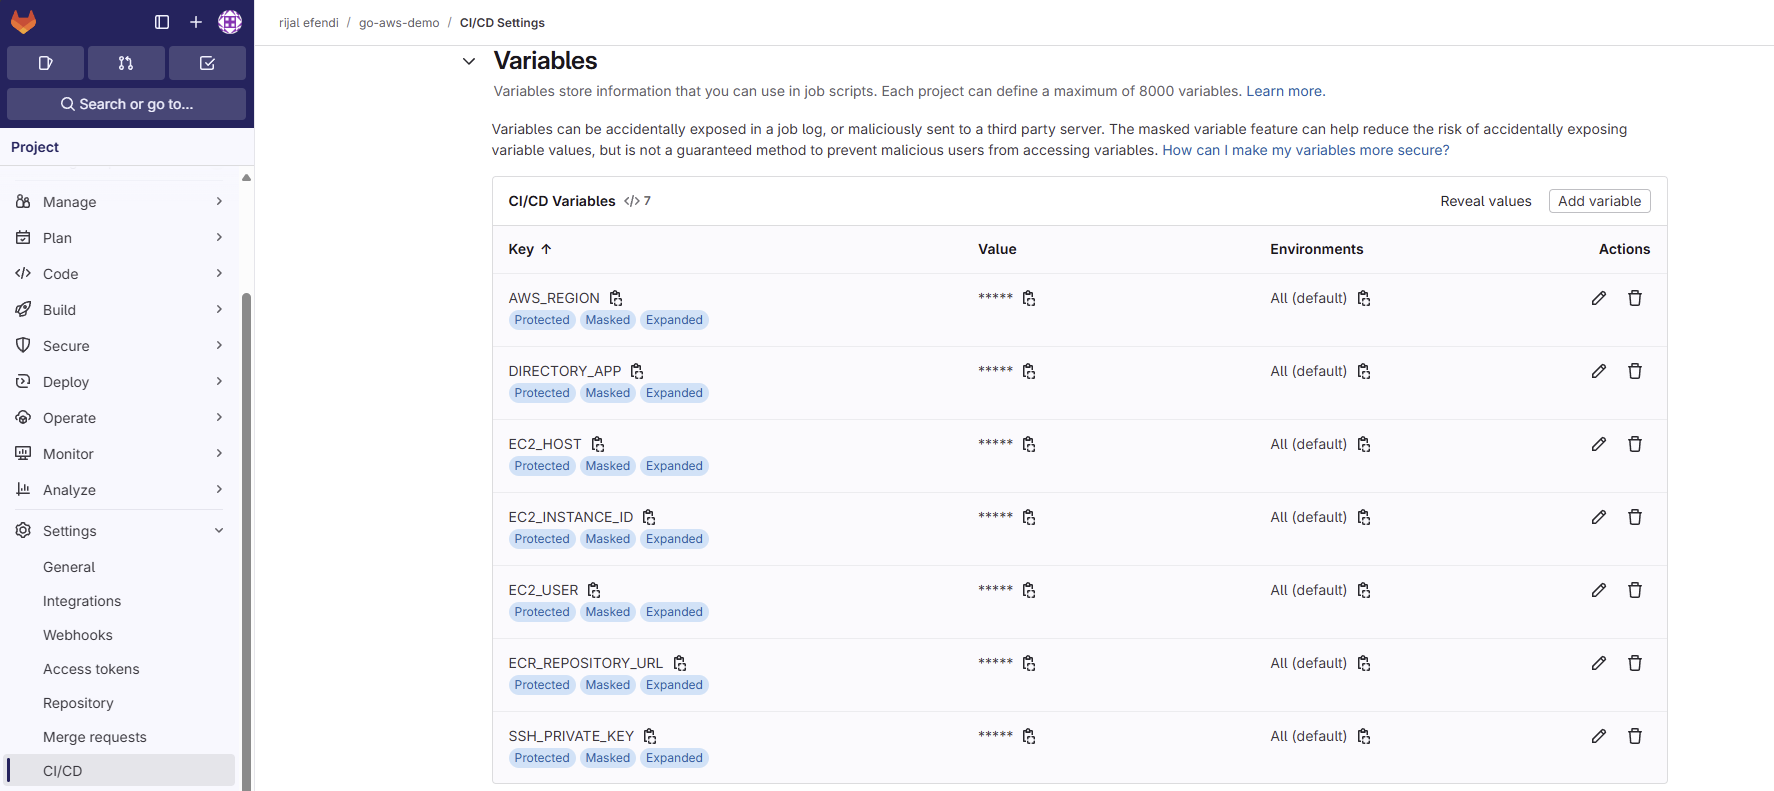
Why Use Parameter Store?

  • Directory path for moving to directory path when running ssm send-command
  • Secret name for passing secret name when running ssm send-command
  • Integration with Other AWS Services

Implementation Steps:

  1. Create Parameter for Secret Name:

    • Access AWS Console > Parameter Store
    • Click "Create parameter"
    • Set parameter name as /myapp/config/secret-name or anything else but make sure it uses forward slash (/) because it is recommended by AWS
    • Leave description empty because it is not required
    • Choose "Standard" tier
    • Set parameter type as "String"
    • Set data type as "Text"
    • Set parameter value like secret name that we created in previous step (mysecretdemo)
    • Leave tags empty because it is not required
    • Click "Create Parameter"
  2. Create Parameter for Directory Path:

    • Access AWS Console > Parameter Store
    • Click "Create parameter"
    • Set parameter name as /myapp/config/directory-app or anything else but make sure it uses forward slash (/) because it is recommended by AWS
    • Leave description empty because it is not required
    • Choose "Standard" tier
    • Set parameter type as "String"
    • Set data type as "Text"
    • Set parameter value as /home/ec2-user/go-demo like that we set in Gitlab UI when running ssm send-command
    • Leave tags empty because it is not required
    • Click "Create Parameter"
    Creating a new parameter Creating a new parameter

📄 File Changes

Now that we've set up our AWS services, we need to update our deployment files to use them. Here are the changes required:

1. Gitlab CI Variable Changes

  • We need to add new variable EC2_INSTANCE_ID to our GitLab CI variables.
  • This variable is used to identify the EC2 instance that we want to connect to when using SSM command.
  • You can get the EC2 instance ID from AWS Console > EC2 > Instances > Instance ID.
Adding new variable Updated GitLab CI variable

2. Docker Compose Changes

With our variables set up, we need to modify our docker-compose file to use these environment variables from Secrets Manager:

services:
  go:
    image: $ECR_REPOSITORY_URL:latest
    container_name: go-prod
    restart: always
    ports:
      - "8080:8080"
    environment:
      - DB_HOST=$DB_HOST
      - DB_USER=$DB_USER
      - DB_PORT=$DB_PORT
      - DB_PASSWORD=$DB_PASSWORD
      - DB_NAME=$DB_NAME
      - GIN_MODE=$GIN_MODE
      - PORT=$PORT
      - ECR_REPOSITORY_URL=$ECR_REPOSITORY_URL
      - IMAGE_TAG=$IMAGE_TAG
    depends_on:
      mysql:
        condition: service_healthy
    networks:
      - network-prod
    deploy:
      resources:
        limits:
          cpus: "0.4"
          memory: 200M
        reservations:
          cpus: "0.2"
          memory: 100M

  mysql:
    image: mysql:5.7
    container_name: mysql-prod
    restart: always
    ports:
      - "3306:3306"
    environment:
      - MYSQL_ROOT_PASSWORD=$DB_ROOT_PASSWORD
      - MYSQL_DATABASE=$DB_NAME
    volumes:
      - mysql_data:/var/lib/mysql
    networks:
      - network-prod
    deploy:
      resources:
        limits:
          cpus: "0.5"
          memory: 400M
        reservations:
          cpus: "0.3"
          memory: 250M
    healthcheck:
      test:
        [
          "CMD",
          "mysqladmin",
          "ping",
          "-h",
          "localhost",
          "-u$DB_USER",
          "-p$DB_ROOT_PASSWORD",
        ]
      interval: 10s
      timeout: 5s
      retries: 5
    logging:
      driver: "json-file"
      options:
        max-size: "5m"
        max-file: "2"

networks:
  network-prod:
    driver: bridge

volumes:
  mysql_data:

docker-compose.prod.yml

3. GitLab CI Changes

Now let's update our deploy stage in GitLab CI to use SSM, Parameter Store, and Secrets Manager:

deploy:
  stage: deploy
  tags:
    - docker
  needs:
    - build
  before_script:
    - apk add --no-cache aws-cli
  script:
    - echo "Starting deployment."
    - |
      echo "-----BEGIN RSA PRIVATE KEY-----" > private_key
      echo "$SSH_PRIVATE_KEY" | fold -w 64 >> private_key
      echo "-----END RSA PRIVATE KEY-----" >> private_key
    - chmod 600 private_key
    - scp -o StrictHostKeyChecking=no -i private_key docker-compose.prod.yml $EC2_USER@$EC2_HOST:$DIRECTORY_APP/
    - |
      aws ssm send-command \
        --instance-ids $EC2_INSTANCE_ID \
        --document-name "AWS-RunShellScript" \
        --parameters '{"commands":[
          "DIRECTORY_APP=$(aws ssm get-parameter --name "/myapp/config/directory-app" --query "Parameter.Value" --output text)",
          "cd $DIRECTORY_APP",
          "echo "We use AWS Parameter Store to fetch secrets"",
          "REGION=$(aws ec2 describe-availability-zones --output text --query 'AvailabilityZones[0].[RegionName]')",
          
          "SECRET_NAME=$(aws ssm get-parameter --name "/myapp/config/secret-name" --query "Parameter.Value" --output text)",
          "secrets=$(aws secretsmanager get-secret-value --secret-id $SECRET_NAME --region $REGION --query "SecretString" --output text | jq .)",
          "echo "Secrets fetched successfully 🎉"",
          "export DB_HOST=$(echo $secrets | jq -r ".database.DB_HOST")",
          "export DB_USER=$(echo $secrets | jq -r ".database.DB_USER")",
          "export DB_PORT=$(echo $secrets | jq -r ".database.DB_PORT")",
          "export DB_PASSWORD=$(echo $secrets | jq -r ".database.DB_PASSWORD")",
          "export DB_ROOT_PASSWORD=$(echo $secrets | jq -r ".database.DB_ROOT_PASSWORD")",
          "export DB_NAME=$(echo $secrets | jq -r ".database.DB_NAME")",
          "export AWS_REGION=$REGION",
          "export ECR_REPOSITORY_URL=$(echo $secrets | jq -r ".aws.ECR_REPOSITORY_URL")",
          "export IMAGE_TAG=$(echo $secrets | jq -r ".aws.IMAGE_TAG")",
          "export PORT=$(echo $secrets | jq -r ".app.PORT")",
          "export GIN_MODE=$(echo $secrets | jq -r ".app.GIN_MODE")",
          "aws ecr get-login-password --region $AWS_REGION | docker login --username AWS --password-stdin $ECR_REPOSITORY_URL",
          "docker pull $ECR_REPOSITORY_URL:$IMAGE_TAG || true",
          "if ! docker ps --filter "name=auth-mysql" --filter "status=running" | grep -q "auth-mysql"; then",
          "  echo "Starting mysql service..."",
          "  DB_USER=$DB_USER DB_ROOT_PASSWORD=$DB_ROOT_PASSWORD docker-compose -f docker-compose.prod.yml up -d mysql",
          "else",
          "  echo "MySQL is already running ✅"",
          "fi",
          "docker-compose -f docker-compose.prod.yml stop go",
          "docker-compose -f docker-compose.prod.yml rm -f go",
          "docker image rm $(docker images -q $ECR_REPOSITORY_URL) || true",
          "DB_HOST=$DB_HOST DB_USER=$DB_USER DB_PORT=$DB_PORT DB_PASSWORD=$DB_PASSWORD DB_ROOT_PASSWORD=$DB_ROOT_PASSWORD DB_NAME=$DB_NAME PORT=$PORT GIN_MODE=$GIN_MODE ECR_REPOSITORY_URL=$ECR_REPOSITORY_URL IMAGE_TAG=$IMAGE_TAG docker-compose -f docker-compose.prod.yml up -d go",
          "echo "Deployment completed successfully 🎉""
        ]}'
  rules:
    - if: $CI_COMMIT_BRANCH == "main" && $CI_PIPELINE_SOURCE == "push"
      when: on_success

💡 Key Changes:

  • Removed SSH key handling
  • Added AWS SSM commands
  • Added Secrets Manager integration
  • Environment variables now come from Secrets Manager
  • Docker Compose uses these environment variables

⚠️ Common Pitfalls

  • Forgetting to attach IAM role to EC2
  • Not checking SSM agent status
  • Using Secrets Manager for non-sensitive configuration
  • Storing sensitive data in Parameter Store instead of Secrets Manager

🌟 Learning Journey Highlights

✅ SSH to SSM Migration

  • Improved security
  • Centralized access management

✅ Secrets Management

  • Centralized configuration
  • Secure storage
  • Access control

✅ Parameter Store Usage

  • Configuration management
  • Service integration

📈 Next Steps: Docker Build Improvements

Now that we set up security improvements, let's improve our docker build process, we will do this by:

  • Optimizing Dockerfile with better caching strategies
  • Adding commit ID to Docker images

🔗 Resources

Demo Repository

Full repository with complete implementation can be found here

Official Documentation

Pricing